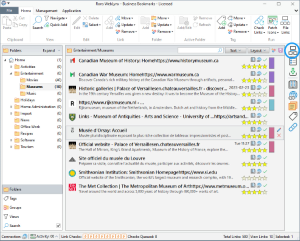
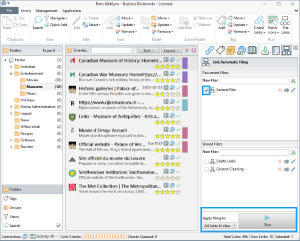
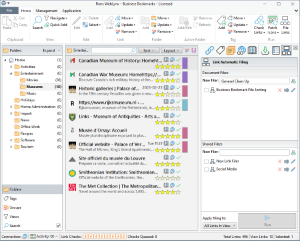
WebLynx contains a very powerful feature specifically designed to remove a large amount of work from organizing links, especially when those links come from chaotic sources such as web pages, search results or PowerPoint presentations. The feature is called Automatic Filing and is easily accessible from the side panel as shown below.
Concepts
There are some key concepts that need to be expressed for a complete understanding of automatic filing, which are outlined below. All of them are explained in more detail in the remainder of the page.
| Automatic Filer | A named collection of filing rules that are executed in sequence to perform the filing of links. |
| Filing Rule |
A single filing operation (of many) within an Automatic Filer such as:
|
| Document (Automatic) Filer | A Filer that is stored within a WebLynx document. |
| Shared (Automatic) Filer | A Filer that is stored outside of a WebLynx document that can be used for all WebLynx documents. |
Navigation - Finding Automatic Filing
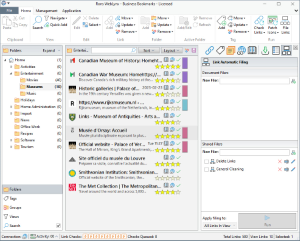
Automatic filing is accessed by clicking the side panel button that shows the Automatic filing sidebar. This panel can be used not only to create Document Filers and Shared Filers, but to execute filers once created.
Document Filers and Shared Filers
The Automatic filing sidebar is split into two different sections, as shown above:
- The Document Filers section (top) contains Filers that are kept in the WebLynx document, which means that the filer can only be used when the document it is stored in is open.
- The Shared Filers section (bottom) contains Filers shared between all WebLynx documents that will be displayed in any WebLynx file, and therefore can be used everywhere.
Creating Automatic Filers
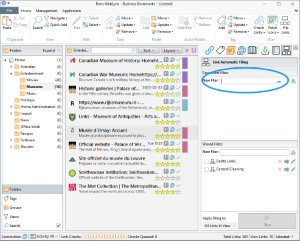
To create a new Automatic Filer a name must be entered in either the Document Filers or Shared Filer area, and the Add button beside the name clicked. The Filer will be created and automatically opened for editing.
Any number of filers can be created, and edited by using the button next to the name.
Editing a Filer
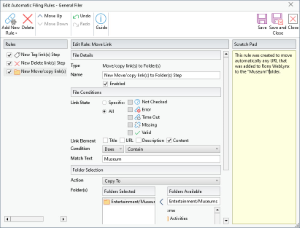
Filers are made up of a sequence of operations (rules) that are executed top to bottom on the links to be filed. The ribbon menu at the top of the Edit Automatic Filing Rules window contains all the options to create, edit, delete, move up or down filing rules.
Link Selection
Once a rule has been added to the list, the application of said rule, to any particular link, depends on the match conditions within the rule, that selects which links to file.
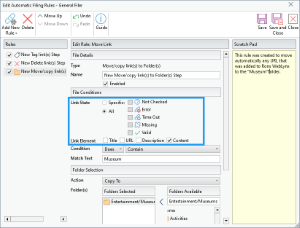
The section under File Condition contains the conditions used to determine if a rule is to be applied as follows. There are essentially two conditions, because the Link Element, Condition and Match Text conditions are related to each other.
| Link State |
The Link State condition has two overarching conditions:
If the condition above is set to Specific the state of the link is checked against any of the following options:
|
| Link Element |
The information within the link to be used to check against Match Text:
|
| Condition |
The type of match to apply between the Link Elements and the Match Text as follows:
|
| Match Text | The text to actually check against the Link Element in the manner specified by the Condition |
Move Links Rule
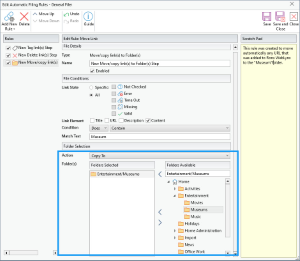
The move link rule allows the manipulation of any matching links folder location, and relies on the following options:
| Action |
|
| Folder(s) |
A list of folders to apply the action to, listed under Folders Selected. Folders
can be selected from the list of existing folders or entered as text separated by
a '/' to indicate sub folders. Note: while the folder selection is available, the folder does not need to exist, and will actually be created if missing (and needed) when the rule is executed. |
Tag Links Rule
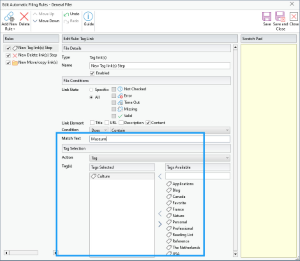
The tag link rule allows the manipulation of any matching links tags, and relies on the following options:
| Action |
|
| Tag(s) |
A list of tags to apply the action to, listed under Tags Selected. Tags can be
selected from the list of existing tags or entered as text. Note: while the tag selection is available, the tag does not need to exist, and will actually be created if missing (and needed) when the rule is executed. |
Delete Links Rule
The Delete link rule simply deleted any matching links. In this case "Delete" means "Remove the link from all folders and all tags" which will add the link to the deleted area in the Views section on the left hand side.
Closing and Saving
Once a Filer has all the rules needed, it can be saved or saved and closed, after which it will be stored either in a shared location (Shared Filers) or in the current WebLynx document (Document Filers).
Running Automatic Filing
To run the Filers that have been created, two details need to be attended to: which filers to run, and which links to apply the Filer(s) to,
To determine which Filers to run simply tick the box beside each Filer before hitting the Run button.
Once one or more Filers have been ticked the links to apply the Filer(s) to can be decided by selection an option from the list below Apply filer to: as follows:
| Selected Links in View | The currently selected links in the central list of links |
| All Links in View | All the links in the central list of links |
| All Links in Document | All the links in the open document |
Once Run, the action result will show in the popping-up Task and Messages information section under the links section: "Auto filing: # links out of # Processed".
Social Media Example
When importing a web pages containing links for a topic being researched (for example), it is quite common to sweep up a few links to social media sites such as Facebook and Twitter, and reference sites such as Amazon. In this example, we are going to organize such links into a folder we designate for each, and tag all the Amazon links that refer to books. For good measure, we are going to delete all the broken links and any links that refer to Google or Bing.
Step 1
Create a new Filer by opening the Filer panel on the right hand side, entering New Filer name ("General Clean Up"), and clicking the Add button. This will open the new Filer for editing.
Step 2
Create a New Move links rule, by clicking Add New Rule, and Move Link Rule in the drop-down menu, and configure it as follows:
| Name | "Move Facebook links" |
| File Conditions |
Link state: "All" Link element: "URL" Condition: "Does contain" Match Text: "facebook" |
| Folder Selection |
Action: "MoveTo" Folders(s): "Tidy Up\Social\Facebook" |
Step 3
Create a new Move links rule and configure it as follows:
| Name | "Move Twitter links" |
| File Conditions |
Link state: "All" Link element: "URL" Condition: "Does contain" Match Text: "twitter" |
| Folder Selection |
Action: "MoveTo" Folders(s): "Tidy Up\Social\Twitter" |
Step 4
Create a new Tag links rule and configure it as follows:
| Name | "Tag Amazon book links" |
| File Conditions |
Link state: "All" Link element: "Title" Condition: "Match Wild Card" Match Text: "*Amazon*book*" |
| Folder Selection |
Action: "Tag" Tags(s): "Book" |
Step 5
Create a new Move links rule and configure it as follows:
| Name | "Move Amazon links" |
|
File Conditions |
Link state: "All" Link element: "URL" Condition: "Does contain" Match Text: "amazon " |
| Folder Selection |
Action: "MoveTo" Folders(s): "Tidy Up\Commercial\Amazon" |
Step 6
Create a new Delete links rule and configure it as follows:
| Name | "Delete broken links" |
| File Conditions |
Link state: "Specific - Error, Missing" Link element: "URL" Condition: "Match Wild Card" Match Text: "*" |
Step 7
Create a new Delete links rule and configure it as follows:
| Name | "Delete Google links" |
| File Conditions |
Link state: "All" Link element: "URL" Condition: "Match Wild Card" Match Text: "*google*" |
Step 8
Create a new Delete links rule and configure it as follows:
| Name | "Delete Bing links" |
| File Conditions |
Link state: "All" Link element: "URL" Condition: "Match Wild Card" Match Text: "*bing*" |
Step 9 - Finally
Once the Filer rules have been created the Filer can be saved, by clicking Save and Close and is ready to be applied.
Related Information
Rons WebLynx
